
React中没有类似Angular那样的双向数据绑定,在做一些表达复杂的后台类页面时,监听、赋值、传递、校验时编码相对复杂,满屏的样板代码伤痛欲绝,故引入可以解决这些问题的
redux-form(v6) 模块。本文大致翻译了官方文档一些比较重要的地方,结合官方Demo加入了一些特性,有些官方跑不起来的地方也进行了优化。
- 项目地址: https://github.com/tedyuen/react-redux-form-v6-example
- 在线演示地址
- 本地演示方法:
npm install && npm run start - 如对翻译有困惑,请移步官方文档,对Demo的理解有异议欢迎留言或私信。转载请注明出处Ted Yuen
目录
起步
在使用 redux-form 之前,需要具备以下基础:
关于 redux-form 的三个主要模块:
-
formReducer reducer: 表单的各种操作以 Redux action 的方式,通过此 reducer 来促使 Redux store 数据的变化。 -
reduxForm() HOC: 此高阶组件用以整合 Redux action 绑定的用户交互与您的组件,并返回一个新的组件供以使用。 -
<Field/>: 用此代替您原本的<input/>组件,可以与redux-form的逻辑相连接。
数据流:
在大部分情况下您不需要关心如何创建action,一切都是自动的。下图展示了一个简易的数据流:
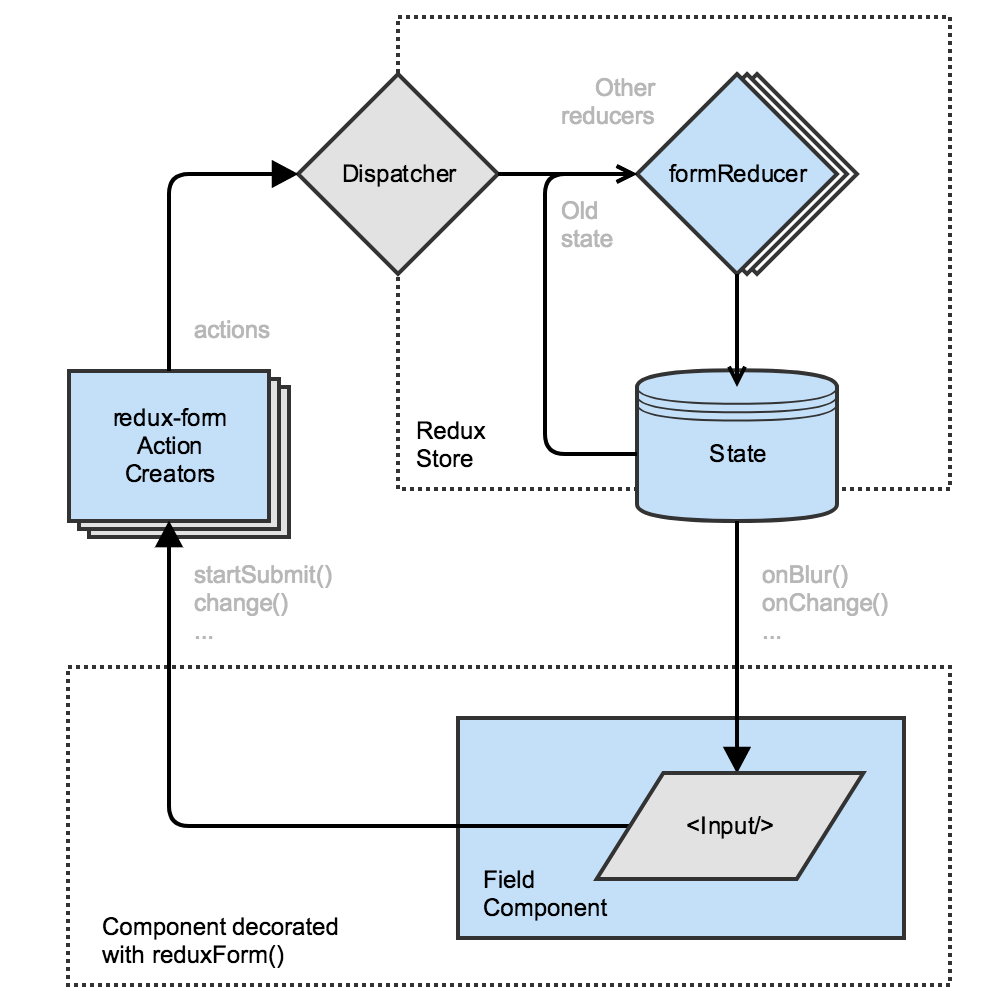
举个简单的例子,我们有一个被 reduxForm() 创建的表单组件,里面有一个用 <Field/> 创建的 <input/> 组件,数据流大概是这个样子的:
- 用户点击这个
<input/>组件, - “Focus action” 被触发,
- formReducer 更新了对应的状态,
- 这个状态被传回
<input/>组件中。
与此类似的在这个 <input/> 中输入文字、更改状态、提交表单,也是遵循以上这个流程。
redux-form 还能基于此流程处理许多事情,诸如:表单验证与格式化,多参数与action的创建。基于以下的向导,请自助挖掘更深层次的功能。
基本使用向导
步骤 1/4: Form reducer
store需要知道组件如何发送action,因此我们需要在您的store中注册 formReducer,他可以服务于整个app中你定义的所有表单组件,因此只需要注册一次。
import { createStore, combineReducers } from 'redux'
import { reducer as formReducer } from 'redux-form'

const rootReducer = combineReducers({
  // ...your other reducers here
  // you have to pass formReducer under 'form' key,
  // for custom keys look up the docs for 'getFormState'
  form: formReducer
})

const store = createStore(rootReducer)
注: 在reducer中合并的formReducer的key必须命名为"form"。如果您因某些原因需要自定义key,请移步 getFormState config查看详情。
步骤 2/4: Form component
为了使您的表单组件可以与store进行交互,我们需要使用高价函数 reduxForm() 来包裹您的组件。他可以在您执行提交表单等操作的时候,以props的方式提供表单内的state。
import React from 'react'
import { Field, reduxForm } from 'redux-form'

let ContactForm = props => {
  const { handleSubmit } = props
  return (
    <form onSubmit={ handleSubmit }>
      { /* form body*/ }
    </form>
  )
}

ContactForm = reduxForm({
  // a unique name for the form
  form: 'contact'
})(ContactForm)

export default ContactForm;
现在我们已经有一个表单组件了,让我们添加一些input组件。
注: 如果您觉得 ()() 这类的语法很迷惑,您可以把它分两步来看:
// ...

// create new, "configured" function
createReduxForm = reduxForm({ form: 'contact' })

// evaluate it for ContactForm component
ContactForm = createReduxForm( ContactForm )

export default ContactForm;
步骤 3/4: Form <Field/> Components
<Field/> 组件可以连接所有input类型组件的数据到store中,基本用法如下:
<Field name="inputName" component="input" type="text" />
它创建了一个text类型的<input/>组件,还提供了诸如 value onChange onBlur等属性,用于跟踪和维护此组件的各种状态。
注: <Field/> 组件很强大,除了基本的类型,还可以配置类或者无状态组件,欲了解更多,请移步Field usage。
import React from 'react'
import { Field, reduxForm } from 'redux-form'

const ContactForm = props => {
  const { handleSubmit } = props
  return (
    <form onSubmit={ handleSubmit }>
      <div>
        <label htmlFor="firstName">First Name</label>
        <Field name="firstName" component="input" type="text" />
      </div>
      <div>
        <label htmlFor="lastName">Last Name</label>
        <Field name="lastName" component="input" type="text" />
      </div>
      <div>
        <label htmlFor="email">Email</label>
        <Field name="email" component="input" type="email" />
      </div>
      <button type="submit">Submit</button>
    </form>
  )
}

ContactForm = reduxForm({
  // a unique name for the form
  form: 'contact'
})(ContactForm)

export default ContactForm;
从现在开始,表单上的操作数据已经可以填充至store,并可以执行提交表单操作了。
步骤 4/4: Reacting to submit
提交的数据以JSON对象的形式注入了此表单组件的 onSubmit 方法里了,可以打印出来看:
import React from 'react'
import ContactForm from './ContactForm'

class ContactPage extends React.Component {
  submit = (values) => {
    // print the form values to the console
    console.log(values)
  }
  render() {
    return (
      <ContactForm onSubmit={this.submit} />
    )
  }
}
表单value的生命周期
本节对理解您的组件value通过 redux-form 的流向很重要
Value 生命周期钩子函数
redux-form 提供了3个 value 生命周期钩子函数,通过props传递给Field组件,并且都是可选的。
format(value:Any) => String
格式化从store里拿出来的数据渲染到组件里,通常会在store保留原来的数据类型,只是在组件中使用的时候进行格式化。
parse(value:String) => Any
把用户输入的string类型的数据进行格式转化,放入store供你使用,也会在store保留转化后类型的数据。
normalize(value:Any, previousValue:Any, allValues:Object, previousAllValues:Object) => Any
允许您对当前字段数据添加某些约束的逻辑,比如可以约束 midDate 的日期在 maxDate 之前等。如果你添加了这些逻辑,通过 normalize()的value将会被解析。
Value 生命周期

API
限于篇幅问题,在此只列举每一种api常用的使用方法,具体请移步官方API文档
API:reduxForm(config:Object)
通过配置一些参数创建一个可以让你配置你的表单的修饰器。诸如配置如何做表单验证、提交成功或失败的回调、获取或失去焦点的action发送、prop命名空间等,具体例子会在之后的demo中介绍。
Importing
var reduxForm = require('redux-form').reduxForm;  // ES5

import { reduxForm } from 'redux-form';  // ES6
常用参数介绍
必要参数
-
form : String[required]: 用于命名您的表单,在store生成此命名的数据节点。
可选参数
-
onChange : Function [optional]: 表单触发 onChange 事件后的回调。 -
onSubmit : Function [optional[: 表单提交配置,可以配置需要提交哪些参数,还有提交时触发的dispatch等。 -
onSubmitSuccess : Function [optional]&onSubmitFail : Function [optional]: 提交表单成功和失败的回调。 -
shouldValidate(params) : boolean [optional]: 同步验证。 -
shouldAsyncValidate(params) : boolean [optional]: 异步验证。 -
touchOnBlur : boolean [optional]&touchOnChange : boolean [optional]: 标识onBlur或onChange的触发。
API:props
列出全部当前页面由 redux-form 生成用于修饰此表单组件的props。
如果你希望用严格模式来编写 PropTypes, redux-form 会导出此处所有的 propTypes,你需要引用他们并可以添加自己的propTypes,像这样:
import {reduxForm, propTypes} from 'redux-form';

class SimpleForm extends Component {
  static propTypes = {
    ...propTypes,
    // other props you might be using
  }
  // ...
}
常用属性
-
pristine:true表示表单数据为原始数据没被修改过,反之为dirty。 -
submitting: 用于表示您的表单提交状态,他只会在您的表单提交后返回一个promise对象时起作用。false表示promise对象为resolved或rejected状态。 -
handleSubmit(eventOrSubmit) : Function: 提交表单的函数,如果表单需要验证,验证方法会被执行(包括同步和异步)。调用方法有两种:- 组件内部直接调用
<form onSubmit={handleSubmit}> - 赋值给prop外部调用
<MyDecoratedForm onSubmit={data => {//do something with data.}}/>
- 组件内部直接调用
API:Field
所有您需要与 store 数据连接的表单组件,都可以用 <Field/>。在正确使用它之前,有三条基本概念您需要了解清楚:
- 必须包含
name属性。可以是简单的字符串,如userName、password,也可以是复杂的结构,如contact.billing.address[2].phones[1].areaCode。 - 必须包含
component属性。可以是一个组件、无状态组件或者DOM所支持的默认的标签(input、textarea、select)。 - 其他所有属性会通过prop传递到元素生成器中。如
className
Importing
var Field = require('redux-form').Field;  // ES5

import { Field } from 'redux-form';  // ES6
使用方法
1.组件
可以是任何自定义的 class 组件活着其他第三方库。
// MyCustomInput.js
import React, { Component } from 'react'

class MyCustomInput extends Component {
  render() {
    const { input: { value, onChange } } = this.props
    return (
      <div>
        <span>The current value is {value}.</span>
        <button type="button" onClick={() => onChange(value + 1)}>Inc</button>
        <button type="button" onClick={() => onChange(value - 1)}>Dec</button>
      </div>
    )
  }
}
然后这样使用:
import MyCustomInput from './MyCustomInput'

...

<Field name="myField" component={MyCustomInput}/>
2.无状态组件
这是一个非常灵活的使用 <Field/> 的方法,使用方法和 redux-form 的前一个版本很相似。但必须在你的 render() 方法外定义它,否则它每次渲染都会被重建,并且由于组件的 prop 会变,就会强制 <Field/> 进行渲染。如果你在 render() 内部定义无状态组件,不但会拖慢你的app,而且组件的input每次都会在组件重新渲染的时候失去焦点。
// outside your render() method
const renderField = (field) => (
    <div className="input-row">
      <input {...field.input} type="text"/>
      {field.meta.touched && field.meta.error &&
       <span className="error">{field.meta.error}</span>}
    </div>
  )

// inside your render() method
<Field name="myField" component={renderField}/>
3.string: input, select, or textarea
比如创建一个文字输入框组件
<Field component="input" type="text"/>
API:Fields
与 Field 相似,但是它同时使用多个fields。<Fields/> 在 name 属性中使用一组表单name的数组,而不是用单一一个 name 属性来表示。
重要: 请节制使用 <Fields/>,其内部任何表单组件数据变化时,都会重新渲染整个 <Fields/>。因此会成为您app的性能瓶颈。除非你真的需要这么做,最好还是用 <Field/> 来一个个自定义您的表单组件
Importing
var Fields = require('redux-form').Fields;  // ES5

import { Fields } from 'redux-form';  // ES6
使用方法
与 <Field/> 差不多,有2种使用方式,组件与无状态组件,这里不详细介绍。
API:FieldArray
这个组件可以让你定义一系列的表单,它的工作原理和 <Field/> 一样。通过 <Field/>,给它一个 name,就可以映射到 Redux state中的指定位置。组件也可以通过连接到 Redux state 的 props 进行渲染。
通过 <FieldArray/> ,你也需要和 <Field/> 一样给它一个 name。而你注入 <FieldArray/> 的组件会通过字段数组收到一系列的 props,用以查询、更新和迭代。
Importing
var FieldArray = require('redux-form').FieldArray;  // ES5

import { FieldArray } from 'redux-form';  // ES6
使用方法
后面Demo里会具体介绍
API:Form
Form 组件对React的form组件进行了简单的封装,用以触发用 redux-form 修饰的组件的 onSubmit 函数。
您可以在以下场景中使用它:
- 在您表单组件内部,可以通过
onSubmit={this.props.handleSubmit(this.mySubmitFunction)}执行您的提交。 - 或者
- 通过 submit() Instance API来启动您的提交内容。(即,在引用您的表单组件的地方直接调用)
- 通过
dispatch一个action的方式启动调用。请参考 Remote Submit Example
如果您只是将 onSubmit 函数作为你的配置或属性,那么你不需要用到这个组件。
Importing
var Form = require('redux-form').Form;  // ES5

import { Form } from 'redux-form';  // ES6
使用方法
只需要将您组件中所有 <form> 替换成 <Form> 即可。
API:FormSection
FormSection 可以很简单地将现有的表单组件分割成更小的组件,用以在复杂的表单中进行复用。它是通过明确规定好的 Field、Fields和FieldArray字组件 name的前缀来完成此功能的。
使用方法
这个例子所描述的业务是一个购买人与收件人视角的订单用户信息表单结构。购买人与收件人拥有相同的字段结构,因此把这个部分拆分成一个名为 Party 的组件是有意义的。假设现在 Party 包含 givenName middleName surname address 这几个字段,然后将 address 部分再度拆分成可重用的组件 Address。代码如下:
//Address.js
class Address extends Component {
    render() {
        return <div>
            <Field name="streetName" component="input" type="text"/>
            <Field name="number" component="input" type="text"/>
            <Field name="zipCode" component="input" type="text"/>
        </div>
    }
}

//Party.js
class Party extends Component {
    render() {
        return <div>
            <Field name="givenName" component="input" type="text"/>
            <Field name="middleName" component="input" type="text"/>
            <Field name="surname" component="input" type="text"/>
            <FormSection name="address">
                <Address/>
            </FormSection>
        </div>
    }
}

//OrderForm.js
class OrderForm extends Component {
    render() {
        return <form onsubmit={...}>
            <FormSection name="buyer">
                <Party/>
            </FormSection>
            <FormSection name="recipient">
                <Party/>
            </FormSection>
        </form>
    }
}
//don't forget to connect OrderForm with reduxForm()
字段完整的名字最后将变成如 buyer.address.streetName 的形式,结果结构如下:
{
    "buyer": {
        "givenName": "xxx",
        "middleName": "yyy",
        "surname": "zzz",
        "address": {
            "streetName": undefined,
            "number": "123",
            "zipCode": "9090"
        }
    },
    "recipient": {
        "givenName": "aaa",
        "middleName": "bbb",
        "surname": "ccc",
        "address": {
            "streetName": "foo",
            "number": "4123",
            "zipCode": "78320"
        }
    }
}
类似 Address 的组件很少更改它的 name,为了使组件继承 FormSection 而不是 Component,需要设置一个默认的 name 如下:
class Address extends FormSection {
    //ES2015 syntax with babel transform-class-properties
    static defaultProps = {
        name: "address"
    }
    render() {
        return <div>
            <Field name="streetName" component="input" type="text"/>
            <Field name="number" component="input" type="text"/>
            <Field name="zipCode" component="input" type="text"/>
        </div>
    }
}
//Regular syntax:
/*
Address.defaultProps = {
    name: "address"
}
*/
API:formValues()
作为一个修饰,可以读取当前表单的 value。当表单子组件的 onChange 依赖于当前表单里的值,很有用。
Importing
var formValues = require('redux-form').formValues;  // ES5

import { formValues } from 'redux-form';  // ES6
使用方法
const ItemList = formValues('withVat')(MyItemizedList)

const ItemList = formValues({showVat: 'withVat'})(MyItemizedList)
这些装饰组件现在分别拥有了 withVat与showVat的 props。
API:formValueSelector()
formValueSelector 的API可以很方便的 connect() state的值到表单的 value 里。它可以通过表单的 name 为你的表单创建一个 value 拾取器。
Importing
var formValueSelector = require('redux-form').formValueSelector;  // ES5

import { formValueSelector } from 'redux-form';  // ES6
使用方法
首先需要按照你表单的 name 创建一个 selector。
const selector = formValueSelector('myFormName')
然后有几种方法使用 selector:
1.拾取个别的字段
connect(
  state => ({
    firstValue: selector(state, 'first'),
    secondValue: selector(state, 'second')
  })
)(MyFormComponent)
2.在分好组的 prop 中按组的方式拾取多个字段
connect(
  state => ({
    myValues: selector(state, 'first', 'second')
  })
)(MyFormComponent)
3.把 selector 当作 mapStateToProps 来使用
如果你不需要 state 中其他的属性值,selector作为mapStateToProps可以自动完成这个工作。
connect(
  state => selector(state, 'first', 'second')
)(MyFormComponent)
API:reducer
表单的reducer用来安装您的 Redux state 到您的表单中。
如果您使用 Immutablejs 来管理您的 Redux state,你必须这么从 redux-form/immutable 中导入 reducer 模块。
ES5例子
var redux = require('redux');
var formReducer = require('redux-form').reducer;
// Or with Immutablejs:
// var formReducer = require('redux-form/immutable').reducer;

var reducers = {
  // ... your other reducers here ...
  form: formReducer
};
var reducer = redux.combineReducers(reducers);
var store = redux.createStore(reducer);
ES6例子
import { createStore, combineReducers } from 'redux';
import { reducer as formReducer } from 'redux-form';
// Or with Immutablejs:
// import { reducer as formReducer } from 'redux-form/immutable';

const reducers = {
  // ... your other reducers here ...
  form: formReducer
};
const reducer = combineReducers(reducers);
const store = createStore(reducer);
API:reducer.plugin
表单中返回一个通过附加指定功能 reducers 用以接受 action 的reducer。 它的参数应该是一个能映射 formName和一个(state, action) => nextState reducer 关系的一个对象。通过每一个 reducer的state只能是属于那个表单的一个片段。
说明
flux 体系中最美的一部分应该是所有 reducers(或者 Flux中的标准术语 stores)可以接受所有 actions,他们可以修改基于这些 action来修改数据。举个例子,你有一个登录的表单,当你提交失败的时候,你想清楚密码输入框内的数据,哪怕你的登录的提交信息是属于另一个 reducer/actions体系,你的表单依然可以做出自己的响应。
而不是使用 redux-form 中一个普通的 reducer,你可以通过调用 plugin() 函数来加强你的 reducer。
注:这是一个加强功能的操作用来修改你内部的 redux-form state的片段,如果你不小心使用,会把事情搞砸。
例子
下面这个例子的作用是,当 AUTH_LOGIN_FAIL 的 action 被分发时,可以清除登录表单里的密码输入框:
import { createStore, combineReducers } from 'redux'
import { reducer as formReducer } from 'redux-form'
import { AUTH_LOGIN_FAIL } from '../actions/actionTypes'

const reducers = {
  // ... your other reducers here ...
  form: formReducer.plugin({
    login: (state, action) => {   // <----- 'login' is name of form given to reduxForm()
      switch(action.type) {
        case AUTH_LOGIN_FAIL:
          return {
            ...state,
            values: {
              ...state.values,
              password: undefined // <----- clear password value
            },
            fields: {
              ...state.fields,
              password: undefined // <----- clear field state, too (touched, etc.)
            }
          }
        default:
          return state
      }
    }
  })
}
const reducer = combineReducers(reducers)
const store = createStore(reducer)
API: SubmissionError
这个 throwable error 用于从 onSubmit 返回一个表单验证错误信息。目的是用来区分 promise 失败的原因究竟是验证错误、AJAX I/O错误还是其他服务器错误。如果它是由于表单里 { field1: 'error', field2: 'error' }产生的错误,那这个错误将会被添加到每一个标记过错误属性的字段里,就像异步表单验证错误一样。如果有一个错误没有指定的字段,但是应用到了整个表单,你需要继续传递它,就好像是某个字段调用的 _error一样,然后他会给出一个错误的属性。(就是不管他往外抛)
Importing
var SubmissionError = require('redux-form').SubmissionError;  // ES5

import { SubmissionError } from 'redux-form';  // ES6
使用方法
<MyForm onSubmit={values =>
  ajax.send(values) // however you send data to your server...
    .catch(error => {
      // how you pass server-side validation errors back is up to you
      if(error.validationErrors) {
        throw new SubmissionError(error.validationErrors)
      } else {
        // what you do about other communication errors is up to you
      }
    })
}/>
API: Action Creators
redux-form 对外开放了所有的内部 action creators,允许你按找你的意愿来完成对分发 action 的控制。进而,官方推荐您在完成您大部分需求的时候,对于那些表单里指定需求的字段的 action来说,当作这些 action 已经绑定到 dispatch一样,直接将这些 action 通过 props 传递。
具体 action 请参考官方文档。
API: Selectors
redux-form 提供了一系列有用的 Redux state 拾取器,可以在app的任何地方任何表单内拾取 state 上的数据。
下列所有拾取器拥有统一的使用方法: 他们都(除了getFormNames)使用表单的名字,来创建一个拾取器,无论表单的 state是什么。
import {
  getFormValues,
  getFormInitialValues,
  getFormSyncErrors,
  getFormMeta,
  getFormAsyncErrors,
  getFormSyncWarnings,
  getFormSubmitErrors,
  getFormNames,
  isDirty,
  isPristine,
  isValid,
  isInvalid,
  isSubmitting,
  hasSubmitSucceeded,
  hasSubmitFailed
} from 'redux-form'

MyComponent = connect(
  state => ({
    values: getFormValues('myForm')(state),
    initialValues: getFormInitialValues('myForm')(state),
    syncErrors: getFormSyncErrors('myForm')(state),
    fields: getFormMeta('myForm')(state),
    asyncErrors: getFormAsyncErrors('myForm')(state),
    syncWarnings: getFormSyncWarnings('myForm')(state),
    submitErrors: getFormSubmitErrors('myForm')(state),
    names: getFormNames('myForm')(state),
    dirty: isDirty('myForm')(state),
    pristine: isPristine('myForm')(state),
    valid: isValid('myForm')(state),
    invalid: isInvalid('myForm')(state),
    submitting: isSubmitting('myForm')(state),
    submitSucceeded: hasSubmitSucceeded('myForm')(state),
    submitFailed: hasSubmitFailed('myForm')(state)
  })
)(MyComponent)
Examples
Demo: Simple Form
这个例子把表单所有基本的元素都列了出来,和官方Demo有所区别的是,增加了2个 type 为 file 的 Field (直接在 Field 中使用 file 的类型会有点问题),一个是使用了jQuery的 dropify 编写的上传单个文件的组件 MyDropify,一个是使用了 dropzone 编写的上传多个文件的组件 MyDropzone (在这里使用了 react-dropzone 和 redux-form 的组合)。官方的例子不单独介绍了,主要贴一下两个自定义 Field。
注:由于reducer设计之初是纯函数,而提交文件的表单最后取得的值是一个 file 对象,当您使用了 redux-immutable-state-invariant 之类的检测工具,对其中诸如 lastModifiedDate 的值会报错,具体请看。在此,我们暂时先不考虑immutable的问题。
Simple路径
src/components/demo/simple/
MyDropify
src/components/utils/MyDropify.js
代码:
import React, { Component } from 'react';
const $ = window.$;
require('dropify');

class MyDropify extends Component {
  componentDidMount(){
    $('.dropify').dropify();
  }
  render() {
    const { input,dataAllowedFileExtensions } = this.props
    const onAttachmentChange = (e) => {
        e.preventDefault();
        const files = [...e.target.files];
        input.onChange(files);
    };
    return (
      <div>
        <input type="file"
               onChange={onAttachmentChange}
               className="dropify"
               data-allowed-file-extensions={dataAllowedFileExtensions} />
      </div>
    )
  }
}

export default MyDropify;
使用方法:
  <div className="form-group">
    <div className="input-group">
      <label>Dropify</label>
      <Field component={MyDropify}
             name="inputfile1"
             dataAllowedFileExtensions="doc docx txt pdf xls xlsx jpg png bmp"></Field>
    </div>
  </div>
dropify 的具体用法请参考其官方文档。
MyDropzone
src/components/utils/MyDropify.js
代码:
import React, { Component } from 'react';
import Dropzone from 'react-dropzone';
class MyDropzone extends Component {
  render() {
    const { input,desc,accept } = this.props
    const onDrop = (files) => {
        input.onChange(files);
    };
    return (
      <Dropzone onDrop={onDrop} accept={accept}>
        {({ isDragActive, isDragReject, acceptedFiles, rejectedFiles }) => {
           if (isDragActive) {
             return "This file is authorized";
          }
           if (isDragReject) {
             return "This file is not authorized";
          }
           return acceptedFiles.length || rejectedFiles.length
             ? `Accepted ${acceptedFiles.length}, rejected ${rejectedFiles.length} files`
            : desc;
        }}
      </Dropzone>
    )
  }
}

export default MyDropzone;
使用方法:
  <div className="form-group">
    <div className="input-group">
      <label>Dropzone</label>
      <Field component={MyDropzone}
             name="inputfile2"
             desc="My Dropzone"
             accept="image/png,image/jpeg"></Field>
    </div>
  </div>
react-dropzone 和jQuery版本的有所区别,使用过 dropzone 的应该都知道选择文件可以渲染到框体内,react版本的 dropzone 原声不带这个功能,但它提供了详尽的方法可以自己实现很多功能,比如选择完文件可以渲染到组件中,有时间我再完善此功能。
Demo: Sync Validation
同步的表单验证,包括了错误和警告型配置。官方Demo中只演示了输入框的验证,而这里准备了包括 radio select textarea 的验证方式(checkbox 我会在单独的一章讲解),调用方法可以参见本文的源代码。
Sync Validation路径
src/components/demo/syncValidation/
radioField
src/components/utils/validation/radioField.js
import React from 'react';

const inputField = ({
  input,
  label,
  type,
  meta: { touched, error, warning }
}) => (
  <div className={touched && error ? 'has-error form-group':'form-group'}>
    <div className="input-group">
      <span className="input-group-addon">{label}</span>
      <input {...input} placeholder={label} type={type} className="form-control"/>
    </div>
    {touched &&
      ((error && <div className="help-block with-errors">{error}</div>) ||
        (warning && <div className="help-block with-errors">{warning}</div>))}
  </div>
)

export default inputField;
selectField
src/components/utils/validation/selectField.js
import React from 'react';
const selectField = ({
  input,
  label,
  selects,
  meta: { touched, error, warning }
}) => (
  <div className={touched && error ? 'has-error form-group':'form-group'}>
    <div className="input-group">
      <span className="input-group-addon">{label}</span>
      <select {...input} className="form-control">
        {
          selects.map((item, i) => (
            <option key={i} value={item.value}>{item.text}</option>
          ))
        }
      </select>
    </div>
    {touched &&
      ((error && <div className="help-block with-errors">{error}</div>) ||
        (warning && <div className="help-block with-errors">{warning}</div>))}
  </div>
)

export default selectField;
textareaField
src/components/utils/validation/textareaField.js
import React from 'react';

const textareaField = ({
  input,
  label,
  type,
  cols,
  rows,
  meta: { touched, error, warning }
}) => (
  <div className={touched && error ? 'has-error form-group':'form-group'}>
    <label>{label}</label>
    <textarea {...input} cols={cols} rows={rows} className="form-control"></textarea>
    {touched &&
      ((error && <div className="help-block with-errors">{error}</div>) ||
        (warning && <div className="help-block with-errors">{warning}</div>))}
  </div>
)

export default textareaField;
Demo: Field-Level Validation
除了提供一个验证方法一起验证表单里的值这种方法之外,还可以对每一个 <Field/> 或 <FieldArray/> 分别做验证。官方给的Demo已经足够说明问题了,在这里只针对上面的 Sync Validation 作简单的改写。具体请看代码。
Demo: Submit Validation
一种服务器表单验证较好的方法是在调用 onSubnit 之后返回一个 rejected 的 promise 对象。当您的表单被提交时,有2种方法提供给 redux-form 这个函数。
- 把他当作一个
onSubmit的prop传递给您的装饰组件。那样的话,你可以在您的装饰组件中使用onSubmit={this.props.handleSubmit}确保当用户点击提交按钮的时候触发这个函数。 - 把他当作一个参数传递给您装饰组件内的
this.props.handleSubmit函数。这种情况下,你需要使用onClick={this.props.handleSubmit(mySubmit)}来确保当用户点击提交按钮的时候触发这个函数。
这个错误信息的显示方式和同步验证(Synchronous Validation)后的错误信息一样,但他是通过 onSubmit 函数返回一个封装过的 SubmissionError 对象。这个验证错误就像HTTP的400或500错误一样,和I/O错误是有区别的,并且他还会是这个提交的 promise 对象的状态置为 rejected。
DEMO中没什么花头,和官方一样,就是基于 SyncValidation 把表单验证的逻辑放在了提交后的逻辑中,并抛出了一个 SubmissionError。
Demo: Async Validation
服务器表单验证的方式比较推荐使用Submit Validation,但是可能存在当您填写表单的时候,同时需要服务器端来验证。有一个经典的例子是当一个用户选取一个值,比如用户名,它必须是您系统中唯一的一个值。
为了写一个异步的表单验证,需要给 redux-form 提供一个异步验证的函数(asyncValidation)用来提供一个可以从表单获取数据的一个对象,然后 Redux 分发这个函数,返回一个状态为拥有一个错误对象的 rejects或状态为 reslove 的 promise 对象。
您需要同时指定某几个字段,通过 asyncBlurFields 的属性配置,来标记是否需要在他们失去焦点的时候触发这个异步验证。
重要
- 异步验证会在
onSubmit之前被调用,所以如果你关心的是onSubmit验证,你需要使用 Submit Validation - 当一个字段的同步验证错误时,那它的失去焦点的时候将不会触发异步验证。
Demo中的自定义 <Field/> 的 meta 中有一个 asyncValidating,来标识异步验证的 promise 对象的 Pending 状态。
Demo: Initialize From State
通过 initialValues 属性或 reduxForm() 配置的参数所提供的数据,被加载到表单 state 中,并且把这些初始化数据作为原始数据(pristine)。当 reset() 触发的时候,也会返回这些值。除了保存这些 pristine 值,初始化您表单的这个操作也会替换表单里已经存在的值。
在许多应用中,这些值可能是来自服务器并且储存在其他 reducer 中的。想要得到这些值,你需要使用 connect() 去自己链接 state 然后映射这些数据到您的 initialValues 属性里。
默认情况下,你只需要通过 initialValues 初始化您的表单组件一次即可。目前有2种方法可以通过新的 pristine 值重新初始化表单。
- 传递一个
enableReinitialize属性或配置reduxForm()中的参数为true就可以让表单在每次initialValues属性变化的时候重新初始化,生成一个新的pristine值。如果想要在重新初始化的时候保持已改变过的表单的值,可以设置keepDirtyOnReinitialize为true。默认情况下,重新初始化会将pristine值替换掉已改变过的表单的值。 - 发出一个
INITIALIZEaction(用redux-formaction生成器生成)。
此Demo较之官方Demo,增加了 enableReinitialize 和 keepDirtyOnReinitialize 的用法。以下是代码片段。
InitializeFromStateForm = reduxForm({
  form: 'initializeFromState',// a unique identifier for this form
  enableReinitialize:true,
  keepDirtyOnReinitialize:true,// 这个值表示重新初始化表单后,不替换已更改的值,可以用clear来测试
})(InitializeFromStateForm)
Demo: Selecting Form Values
有时候您希望访问表单组件中某些字段的值,你需要在 store 中直接 connect() 表单的值。在一般的使用情况下,redux-form 通过 formValueSelector 提供了一个方便的选择器。
警告: 需要节制使用这个机制,因为这样的话,表单里的某一个值一旦发生改变,就会重新渲染您的组件。
代码片段:
// Decorate with reduxForm(). It will read the initialValues prop provided by connect()
SelectingFormValuesForm = reduxForm({
  form: 'selectingFormValues',// a unique identifier for this form
})(SelectingFormValuesForm)

// Decorate with connect to read form values
const selector = formValueSelector('selectingFormValues') // <-- same as form name
SelectingFormValuesForm = connect(state => {
  // can select values individually
  const hasEmailValue = selector(state, 'hasEmail')
  const favoriteColorValue = selector(state, 'favoriteColor')
  // or together as a group
  const { firstName, lastName } = selector(state, 'firstName', 'lastName')
  return {
    hasEmailValue,
    favoriteColorValue,
    fullName: `${firstName || ''} ${lastName || ''}`
  }
})(SelectingFormValuesForm)

export default SelectingFormValuesForm
Demo: Field Array
这个例子展示了怎样构建一个字段组,包括拥有一个字段的和拥有一组字段的字段组。在这个表单里,每一个俱乐部的成员都有姓和名,还有一个兴趣的列表。以下这些数组的操作 insert, pop, push, remove, shift, swap, unshift 行为是被允许的:(更多详细的内容可以参考FieldArray Docs)
- 一个
action的原始构造 - 通过您表单的
this.props.array对象绑定的action - 同时绑定表单和通过
FieldArray组件获得的对象上的数组的action
Demo: Remote Submit
这个例子演示了一个表单如何从一个无关的组件或中间件中发送的一个 SUBMIT 的action来执行提交逻辑。
这个例子里你所看到的的提交按钮,不是直接与表单组件直接链接的,它的作用只是通过 Redux 发送的一个提交的 action。
要注意它的工作方式,这个提交函数必须通过 reduxForm() 配置参数的传递或通过 prop 提供给表单组件。以下是发送这个action的方式:
import React from 'react'
import { connect } from 'react-redux'
import { submit } from 'redux-form'

const style = {
  padding: '10px 20px',
  width: 140,
  display: 'block',
  margin: '20px auto',
  fontSize: '16px'
}

const RemoteSubmitButton = ({ dispatch }) => (
  <button
    type="button"
    style={style}
    onClick={() => dispatch(submit('remoteSubmit'))}
  >
    Submit
  </button>
)
//   remoteSubmit 为表单的名字
export default connect()(RemoteSubmitButton)
Demo: Field Normalizing
当您需要在用户输入和 store 中的数据之间施加某些控制,你可以使用 normalizer。normalizer 就是一个每当值改变是,可以在保存到 store 之前进行某些转换的一个函数。
一个常用的例子:你需要一个某些经过格式化的值,比如电话号码或信用卡号。
Normalizers 传递了4个参数:
-
value- 你设置了normalizer字段的值 -
previousValue- 这个值最近一次变化之前的一个值 -
allValues- 表单中,所有字段当前的值 -
previousAllValues- 表单中,所有字段在最近一次变化前的值
这些可以使你基于表单中另外一个字段而限制某个特定的字段。比如例子中的字段最小最大值:这里你不能设置 min 中的值比 max 中的值大,不能设置 max 中的值比 min 的值更小(下面有代码)
const upper = value => value && value.toUpperCase()
const lower = value => value && value.toLowerCase()
const lessThan = otherField => (value, previousValue, allValues) =>
  parseFloat(value) < parseFloat(allValues[otherField]) ? value : previousValue
const greaterThan = otherField => (value, previousValue, allValues) =>
  parseFloat(value) > parseFloat(allValues[otherField]) ? value : previousValue
下面是对电话号码处理的逻辑
const normalizePhone = value => {
  if (!value) {
    return value
  }

  const onlyNums = value.replace(/[^\d]/g, '')
  if (onlyNums.length <= 3) {
    return onlyNums
  }
  if (onlyNums.length <= 7) {
    return `${onlyNums.slice(0, 3)}-${onlyNums.slice(3)}`
  }
  return `${onlyNums.slice(0, 3)}-${onlyNums.slice(3, 6)}-${onlyNums.slice(6, 10)}`
}
Demo: Wizard
一种常见的UI设计模式是把一个单一的表单分割成几组分开的表单形式,最为熟知的就是 Wizard。使用 redux-form 的话有好多方式可以来做这种设计,但最简单和最推荐的方式是遵循一下几种指示:
- 把每一个页面都用同一个表单名字连接到
reduxForm() - 指定
destroyOnUnmount为false就可以在表单组件卸载的时候保存表单数据 - 你可以为整个表单指定一个同步验证函数
- 使用
onSubmit来触发进入下一步,因为它强制运行验证函数
需要由你自己来实现的:
- 在提交成功之后手动调用
props.destory()